Showing posts with label email conversion. Show all posts

Wednesday, 30 March 2016

7 Deadly Sins and 7 Virtues of Email Marketing

how to avoid email marketing traps
Ever heard of the seven deadly sins? They were originally a roadmap for avoiding moral pitfalls that included sloth, envy, and greed.
Today, these seven pitfalls frequently appear in popular culture, including the thriller film Se7en and the Morgan Spurlock documentary television series 7 Deadly Sins.
If you perform a quick online search, you’ll also find playful examples, such as the YouTube video that features examples of each deadly sin taken from various episodes of Spongebob Squarepants. No, I’m not kidding.
With the seven deadly sins all over television, film screens, and social media, I started mulling over the major moral pitfalls of email marketing. Wouldn’t it be great to have a roadmap for email marketing, too?
As content marketers, we need a list of major dangers to steer clear of, so we’re not spinning our wheels and sending ineffective messages that don’t get opened, read, and clicked on.
In this post, you’ll discover the seven email marketing sins we should avoid and the seven desirable email marketing virtues we should work hard to cultivate when creating an email marketing strategy.

Sin #1: Disappearing after you send out your “welcome” message

Many content marketers set up an automated “welcome” message to send to new subscribers, but after that, they completely disappear and don’t email their list members again for a long time.
Some marketers are afraid they will be pests. Others just aren’t sure what to say or how to say it.
Whatever the reason for your email silence, you mustn’t be an email Houdini. You’re missing a huge opportunity to bond with your subscribers if you don’t touch base with your list on a regular basis.

Virtue #1: Regularly sending your audience great content

Emailing valuable content builds relationships with your audience members and helps them get to know you.
Send emails to your list with blog post or podcast notifications, quick tips, or other useful content. Then supplement those emails with regular, relevant offers.
And always remember: Your email subscribers wouldn’t have signed up for your list if they weren’t interested in you, your content, and what you have to say. If you provide value, you’re not being a pest.

Sin #2: Panicking when people unsubscribe from your list

Do unsubscribe notifications strike fear in your heart? If so, you’re not alone. This one is a common (and avoidable) sin.
There are a lot of reasons why people unsubscribe from your list, and you don’t need to worry about most of them. Panicking holds you back and may eventually make you hesitant to send emails to your list.

Virtue #2: Remembering that your ideal community members will stay subscribed

People who discover they aren’t a fit for your list might opt out, and when they do, they save you time, money, and energy.
To combat this fear, you can easily turn off unsubscribe notifications and stop regularly looking in your email service provider to see how many people have left your list.

Sin #3: Over-promoting or under-promoting

If you send too many promotions to your list, your subscribers may become annoyed and less likely to buy from you. On the other hand, if you never send relevant offers, you run the risk of being taken for granted as the “free” person.
Over-promotion and under-promotion are both deadly sins of the email marketing world and should be avoided.

Virtue #3: Striking the perfect balance of publishing valuable content and presenting relevant offers

The best thing you can do for your list is send a balanced mix of high-quality content and regular offers.
Take a look at your email editorial calendar, and make sure promotions and content are both part of your emails over the next few months.

Sin #4: Trying to do too much in one email

Nothing’s worse than an email that includes tons of links that direct subscribers to many different pieces of content, landing pages, and sales offers.
Especially in our increasingly mobile world, we simply can’t overload our readers with too much information (and too many links) in one email.
If you try to do too much in one email, your reader will be more likely to think, “Eh, I’ll read this later” and file your message away in email folder purgatory. There’s a good chance it will never be rescued and read.

Virtue #4: Writing focused emails that include a single, strong call to action

Try to stick with a single call to action in each email, if you can. Want someone to read your latest blog post? Great! Stay focused on that, and include clear and easily clickable links.
If you’re sending out a newsletter and multiple links are unavoidable, make sure each article is clearly labeled so your content is manageable.

Sin #5: Being boring

Dull emails are the ultimate sin. Most of your subscribers get tons of emails every day, so carefully consider what you can do to stand out.
Boring emails get lost in the fray and will be deleted.

Virtue #5: Injecting personality into your emails by using your unique voice

Your subscribers want to get to know you — they want to know what you like, what you hate, and what you stand for.
Don’t be afraid to introduce some individuality into your emails by telling stories, sharing your opinions, or showing a bit of your personal side.
Your subscribers will love it, and they’ll be a lot more likely to read your emails.

Sin #6: Sending out emails that aren’t mobile-friendly

More than 65 percent of emails are now opened on smartphones and tablets.
If you’re still sending three-column emails (or other messages that aren’t mobile-friendly), a large portion of your subscribers are having trouble reading your messages.
There’s no excuse for this massive sin in 2016. You simply must be kind to your mobile subscribers.

Virtue #6: Sending single-column emails with large, clickable links

Use a single-column layout, and test your emails on mobile devices to ensure they are easy to navigate and click on.

Sin #7: Neglecting to create a smart, workable email marketing strategy

Many content marketers approach email messages like the task of achieving perfectly cooked pasta — they just throw stuff at the wall and see what sticks.
This sin can be deadly for your business. Confusing, overwhelming, or flat-out poorly crafted emails can hurt your website traffic, your next promotion, and your overall reputation — so you should always think before you hit “send.”

Virtue #7: Mapping out your email plan before you hit “send”

I can’t overstate the importance of having an email marketing strategy before you start getting subscribers to opt in to your list.
You need to determine approximately when you’ll be emailing your list, what you’ll be sending, what your goals are, and what your emails will look like.
A smart email marketing strategy that yields high open rates is sin-free and attractive to your subscribers.

Achieve email marketing success

These seven deadly sins are avoidable in the digital marketing world, and when you steer clear of them, you’ll get that much closer to accomplishing your content marketing goals.
You’ll also be able to build stronger relationships with your subscribers and feel confident every time you send an email to your list. Your conscience (and your subscribers) will be there to encourage you on your journey to ethical, principled content marketing success.
To view the original article Click Here

Saturday, 30 January 2016

How Pairing Personalization & Automation Can Skyrocket Email Conversions

Email inboxes are noisy–and are even more competitive than you might think. The average email user has an inbox made up of about 50% newsletters and 20% social network updates according to Microsoft.
So when a you’re working to stand out from the raucous crowd that’s competing for a user’s attention within the inbox environment, it’s no longer enough to send one-size-fits-all email messages—you need the one-two punch of sending the right personalized message at the right time.
That means harnessing the power of two different features within email: Personalization and automation. Here are some practical tips for getting started.

Personalizing Email Messages

Many businesses and organizations have fallen into the habit of sending mass emails that don’t utilize personalization (like including the recipient’s first name in the subject line.)
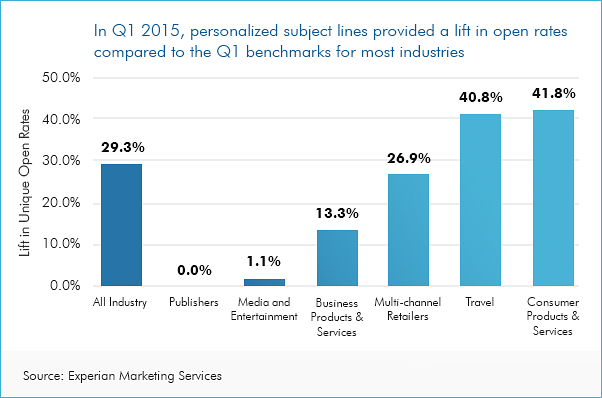
But Experian recently reported that implementing this minor change had a dramatic effect on open rates:
experian-report-open-rates

Image Source
Across almost every industry studied, including the recipient’s name in the email subject line increased open rates–some by as much as 42%. Other research echoed the success of using a recipient’s first name in the subject line, reporting that emails with personalized subject lines are 26% more likely to be opened.
The shocking part is that researchers also found only 35% of marketers are leveraging personalized subject lines.
So, what gives? Is personalizing a subject line confusing? It’s actually pretty simple. As long as you’ve collected a first name from those who opt-in to your email list, personalization takes seconds. Most email providers (like Campaign Monitor,MailChimpAWeber, etc.) enable you to insert a recipient’s first name by inserting a custom field into the subject line.
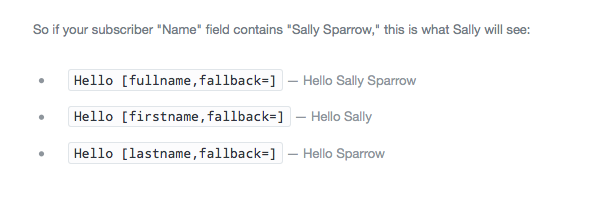
For example: If you were using Campaign Monitor and wanted to personalize your subject line, you’d use [firstname, fallback=] as pictured below:
campaign-monitor-subject-line-personalization
And that’s it. With this simple step, every email recipient will see his/her name appear within the subject line, like in this example from Ipsy:
subject-line-personalization
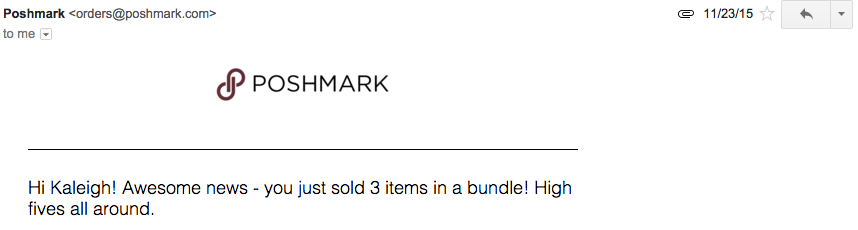
You can also use this same format to include the recipient’s first name within the message body, which ups the personalization just a little bit more, as seen in this email from Poshmark:
poshmark-email
By simply enabling an existing feature on your email platform, you can boost open rates–which is the first step toward increased conversions.

Personalization via Segmentation

The realm of email personalization extends beyond the subject line, too. Aside from having a human element, personalized messages are also highly relevant for recipients–which is a major pain point for about three-fourths of email account owners. Research shows that as many as 74% of online consumers are frustrated by messages that aren’t relevant and don’t fit their interests, which can happen as a side effect of unsegmented email lists that help categorize subscribers.
Along with relevancy, segmented lists also have a slew of other positive effects for email marketing. The DMA reported that segmented at targeted emails generate 58% of all revenue, and that some markets have noted a 760% increase in revenue from segmented campaigns.
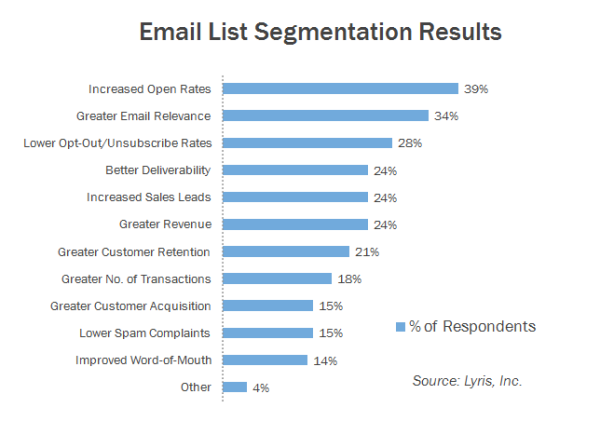
And then there’s data from the Lyris Annual Email Optimizer Report:
email-segmentation-results
The report shows that segmentation also helps boost open rates, drives conversions, and overall increases the quality of communication–making for successful emails that feel tailor-made for each unique recipient.
So how do you go about segmenting your lists?

Step 1: Make a Plan for Segmentation

Every business has different objectives for their email marketing campaigns, but think about the ways in which you currently use email messaging, and how you’d ideally like to use it in the future. From here, you can start to break down a mass list into smaller, more relevant lists and map out your plan for segmentation.
Think about sorting contacts by:
  • Demographics (gender, age, job title, geographic location)
  • Purchase type (specific product categories)
  • General interests (user-indicated topical interests, like special events)
These are just a few ideas to get your mental wheels turning, but think about how you can break down an existing list into more specific categories. Moving forward, you can then enable user-selected sorting capabilities (like the ability to opt-in to different segments of your list for specific types of communication.)
Need more inspiration? See how BuzzFeed uses email segmentation.

Step 2: Build Segments

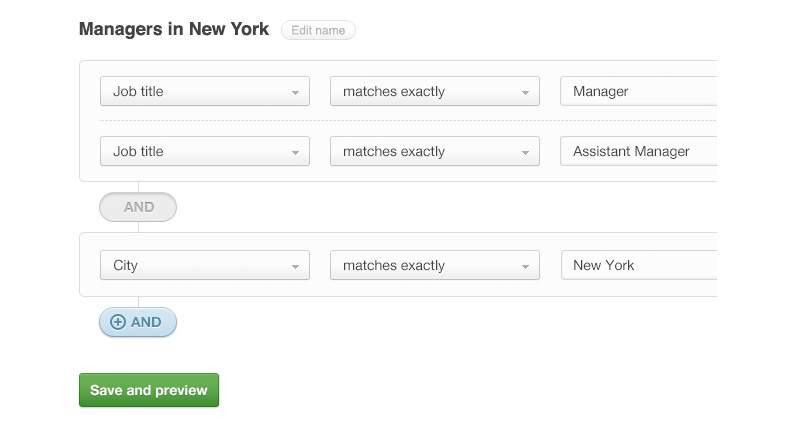
Next, it’s time to start segmenting your list within your email platform. Some email platforms (again, we’ll use Campaign Monitor as an example) will allow you to build segments based on rules and parameters you set.
Here’s what it looks like to build different segments on their platform:
segments-in-email

Image Source
In the example, you can see how you could build out a specific segment that includes managers in New York via parameters that require the title of Manager or Assistant Manage who reside/work in New York.
You can create as few or as many different segments as you like, but each new segment should have a conversion-oriented purpose.
Note: If you want to create detailed segments, you’ll need to collect more detailed information from subscribers during opt-in. Add a few extra fields (like job title, address, etc.) that go beyond name and email address to get the data you need in order to properly segment.

Step 3: Send Accordingly

Once you’ve created your various segments, you can begin launching more specific email campaigns that align with the interests of your various lists.
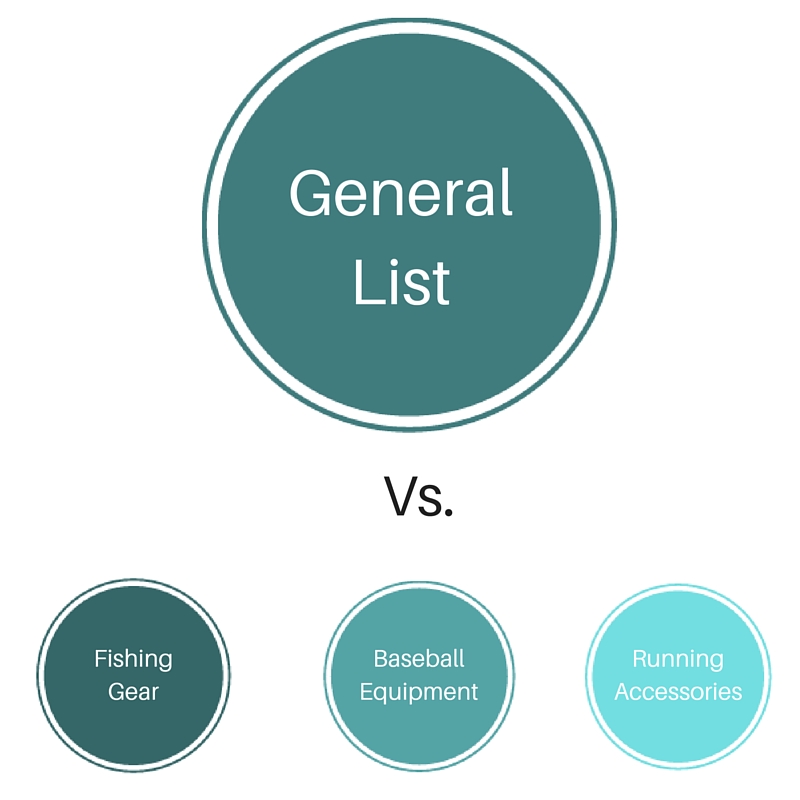
Here’s an example of what that might look like: Imagine you own a retail business that specializes in outdoor sporting equipment. Rather than sending one-size-fits all emails that promote all of your products to a single list, you create segments based around promoting specific types of equipment (like fishing gear, baseball equipment, etc.)
general-email-list-versus
Through website opt-ins and online purchase tracking, you can now send highly relevant information about your specific products to people who’ve are most likely to be interested in that information.
Now that you know how to leverage personalization and segmentation to send the right message to the right email subscribers, let’s look at how you can use automation to send those messages at exactly the right times.

Automating Email Messages

Automated emails enable you to communicate with the right person with the right message at the right time (without having to keep track of each subscriber one by one.)
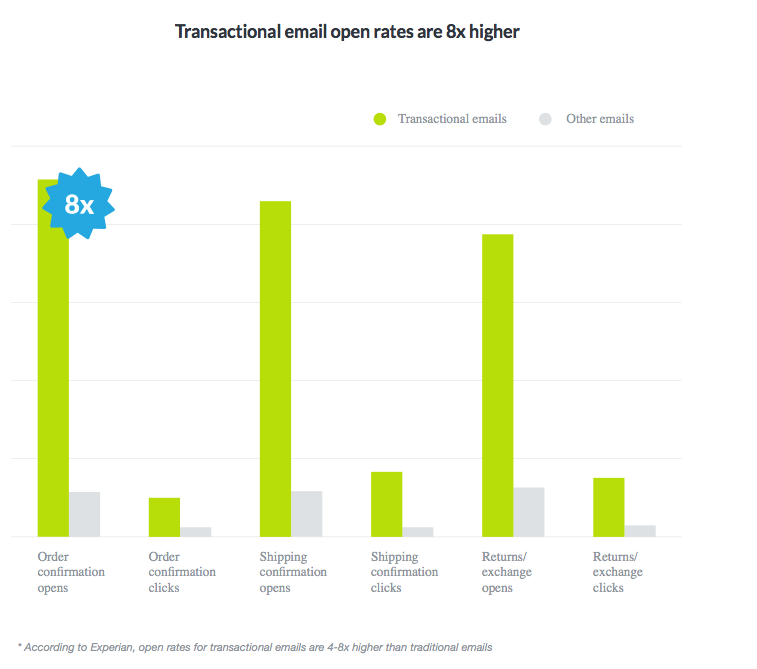
And they’re proven to be successful tools for boosting conversions, too. Experian research found that automated transactional emails have 8x more opens and clicks than any other type of email–and they can generate 6x more revenue. And along with the pure convenience factor it offers, email automation is proven to drive conversion rates by as much as 50% for B2C marketers.
Because of this, more and more companies are hopping on board with automation: it’s used by 82% of B2B and B2C companies, and revenue for marketing automation systems increased by 60% in 2014.
So how can you use email automation?
Many email marketing platforms already have automation features built in (although more often than not, they’re a paid feature.)
Automated emails can:
  1. Act as workflows that auto-send on a schedule (like after a customer makes a purchase)
  2. Auto-send when certain actions have been completed by a user or at a designated point in time (like when a user hasn’t made a purchase in 30 days)
  3. Act as an onboarding series (for use with new customers or new team members)
You can have multiple workflows running at the same time, so think about what different objectives you can accomplish within different series.

How to Set Up Email Automation

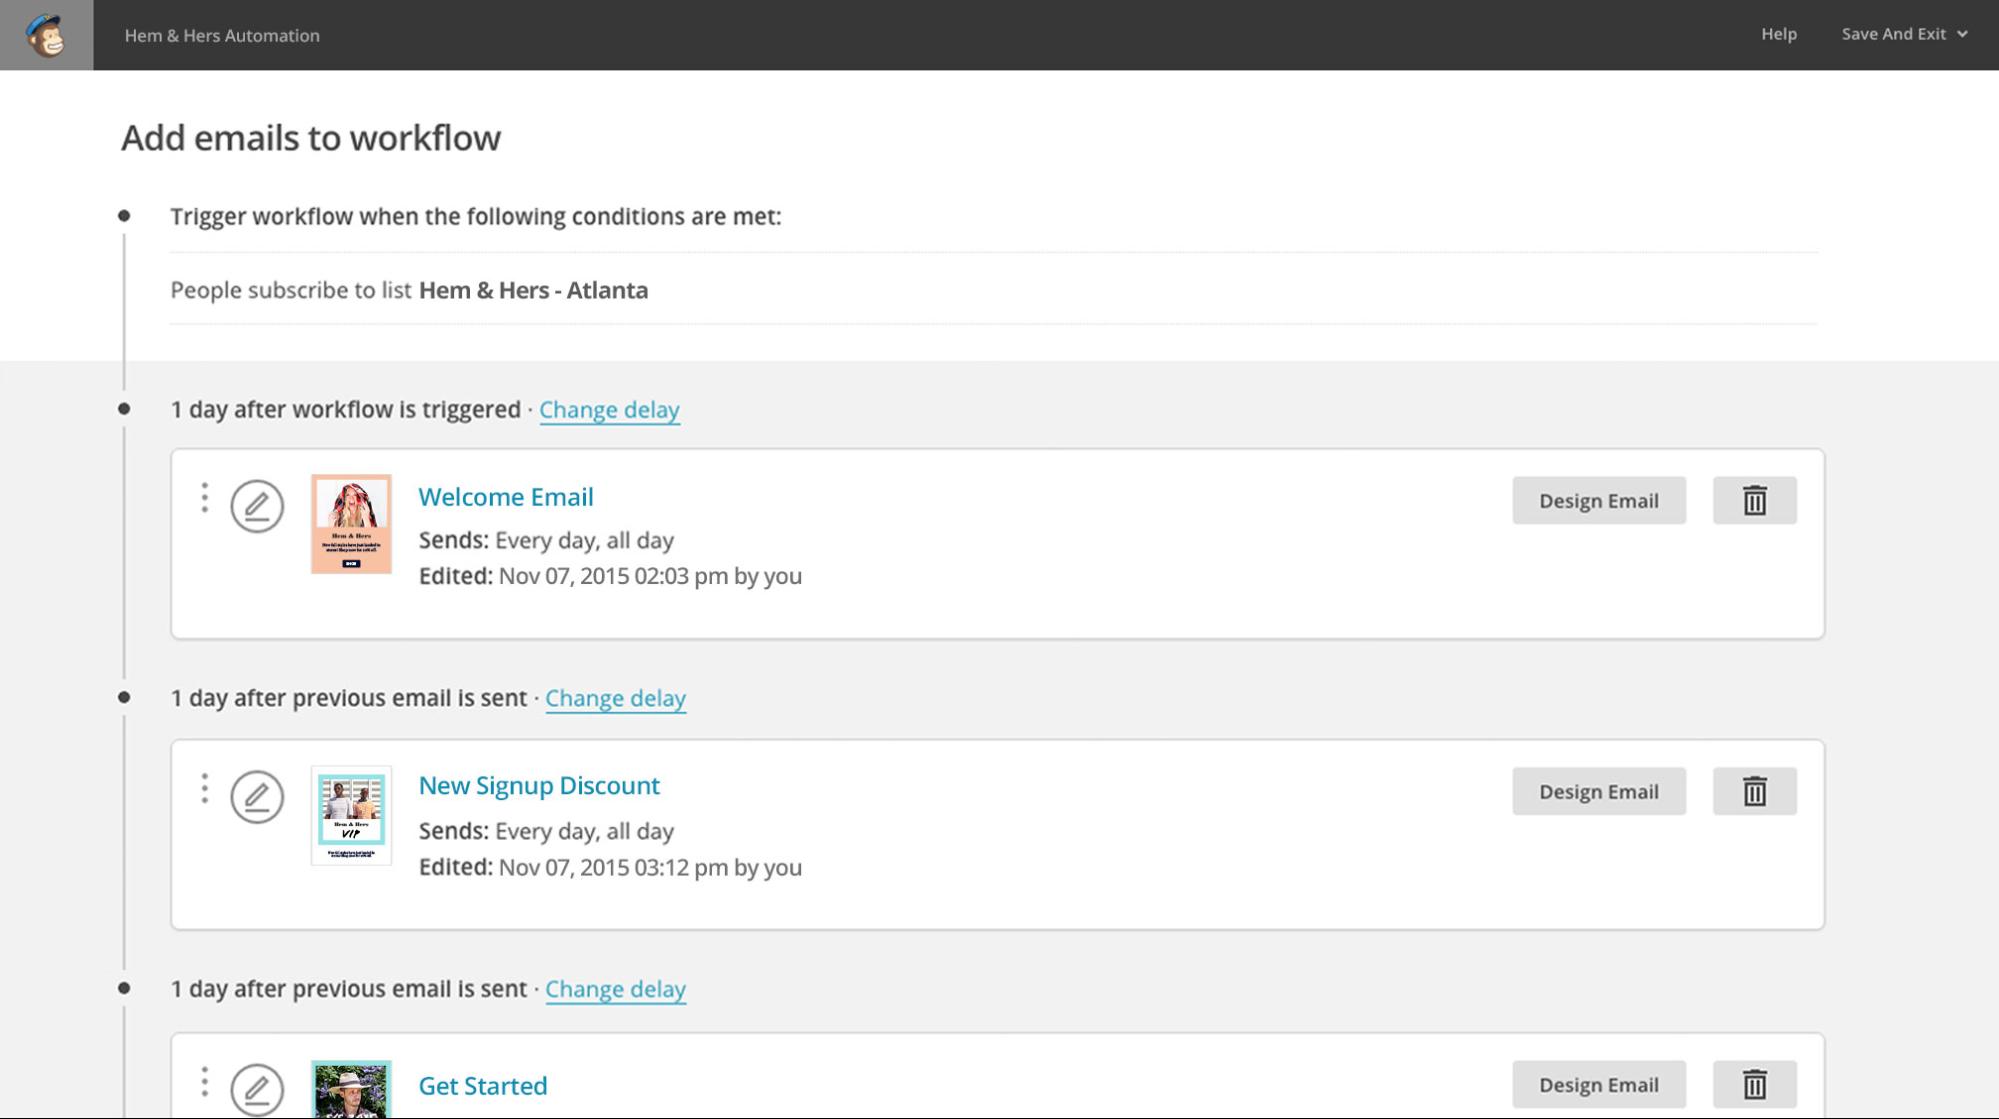
You can set up email automation for a variety of purposes, but let’s look at what it would look like using MailChimp:
mailchimp-email-workflow

Image Source

Step 1: Choose Your Trigger

Using MailChimp, you can set up a workflow that triggers based on an action you select. In this example, the workflow is triggered when someone subscribes to a specific email list, but other triggers might be:
  • When a customer celebrates his/her one-year anniversary of a subscription service
  • When a purchase is made
  • When a customer hasn’t visited the website within X days
From there, you’ll launch an email sequence that drives the recipient through a series of emails that all work together toward a conversion (like an item purchase.)

Step 2: Create Your Email Workflow

Next, put together a series of 3-8 (or more, if you want) that keep the conversation with your subscriber going. In the example, you’ll see that in the example, they’ve created:
  • A welcome email
  • A new signup discount email
  • A getting started email
All of these messages help you stay in touch with the customer while encouraging them to take further action or to re-engage with you.
In your workflow, you can do things like:
  • Showcase other offerings your business has
  • Offer a discount or coupon code to encourage repeat purchases
  • Highlight helpful resources, like how-tos or interesting blog content
  • Leverage visual assets, like a lookbook or video
The goal of these on-going message series is for you to keep reminding your customer of the value you can provide and to keep your brand top-of-mind–so think about what you need to say to accomplish that.
Need more on this part? Read more on outbound email automation tactics here.

Step 3: Schedule Your Timing

Once your email series is ready, you’ll want to map out when these messages will send, and which recipients will receive them. Space out your messages so that they are not overwhelming, but on a timetable that maintains relevancy.
mailchimp-scheduling-segmentation

Image Source
In the example, you’ll see how MailChimp lets you determine when automated messages will send and which segments will receive messages. You’ll want to test different send times to see which pattern is most effective for your audience.

Step 4: Don’t Forget Transactional Emails

Emails that send automatically after a customer completes an action are also part of your automated email strategy–so make sure you are optimizing them with clever copy and smart design. Studies show that messages about order confirmation and shipping confirmation have some of the highest open rates of all.
transactional-emails-data

Image Source
Many of these types of messages only include a standard message with order details, but with such high open rates, you should put these automated messages to work, too.
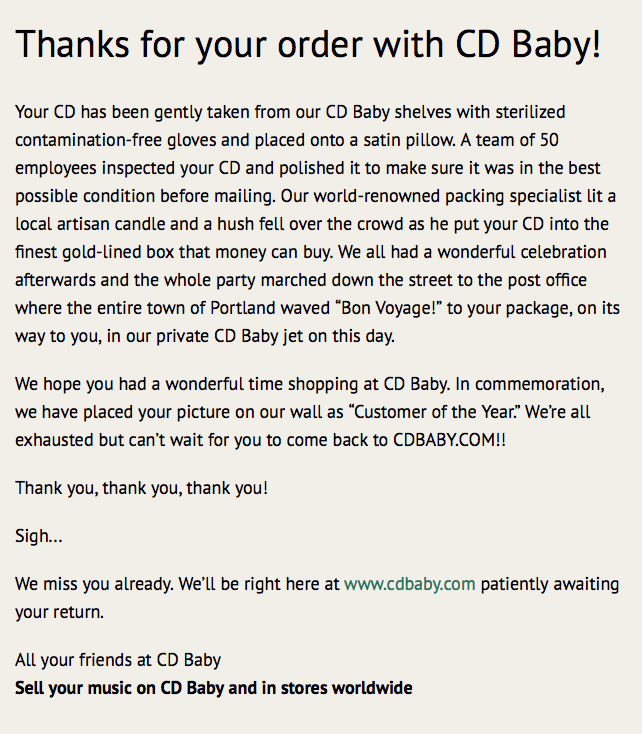
One of the beloved examples of a solid transactional email is this shipping confirmation email from CDBaby, which says:
cd-baby-shipping-confirmation-email

Image Source
See how fun that is? Rather than just saying, “Thanks for your order” this email puts an interesting, lovable spin on what might be an otherwise boring message. Write copy that makes your message memorable for readers.

Step 5: Watch Conversion Rates Soar

Once your workflows go live, keep an eye on metrics like open rate and click-through rate to see how effective your automated campaigns are–and monitor how your conversion rate improves.
Just remember: Automation doesn’t mean set-it-and-forget it. You need to constantly make tweaks and improve based on subscriber feedback and A/B testing–just like with any other email you’d send.

Tools for Execution

The final question in this equation, then, is: What email platforms can I use to harness the power of both personalization and automation? Here’s a brief summary of a few options–but there are many, many more you can look into as well.
Campaign Monitor
This platform has a whole gallery of mobile-friendly templates you can customize, as well as lots of helpful resources for all aspects of email marketing. Thanks to built-in metrics and multiple integrations, you can study campaign success and make email marketing a seamless part of your operation.
Price: $9-49/month
Hubspot
Hubspot offers a full-service solution for marketers with everything from email, to CRM, to social media management, and more. If you’re looking for a one-stop-shop for all of your online marketing efforts, this is powerful option with a training system built right in.
Price: $200-2,400/month
MailChimp
Using MailChimp, you can take full advantage of a variety of different email tools, like A/B testing, automation, and more. Create custom templates or use their free options to build and send customized emails. Here you’ll find lots of teaching resources, helpful integrations, mobile-friendly designs, and advanced metrics for studying the success of your campaigns.
Price: $25 and up, based on number of subscribers
AWeber
AWeber prides itself on its integration with other apps, its suite of advanced tools, and self-hosted opt-in forms. Again, tons of free guides to help you get started and webinars that enable you to get the most out of this platform.
Price: $19 and up, based on number of subscribers
Constant Contact
One of the long-standing figures in the email marketing industry, this platform touts ease of use. Here, you can take advantage of templates, learn how to improve email marketing efforts, and get access to 24/7 support.
Price: $20 and up, based on number of subscribers
Again, these five options are just the tip of the iceberg when it comes to your options for sending email, so look around and see which interface and tools best fit your needs. The bottom line is that you need to find an email marketing service that works with your budget and covers all of your needs for both personalization and automation.

Personalization + Automation = More Conversions

The numbers don’t lie–a combination of personalized email marketing and automated messaging are a surefire way for you to increase the success of your campaigns. Follow the steps for personalizing email, segment your lists, and put automated and triggered emails to work for your business.
To view the original article Click Here

Friday, 8 January 2016

7 Strategies to Make Your Lifecycle Emails Work Smarter For You

One of my favorite learning moments this year was hearing from StatusPage.ioCEO Steve Klein how getting your lifecycle emails right can increase your conversion rate and revenue to the point where you gain the breathing room to concentrate on other priorities.
Lifecycle emails give your business breathing room
In this tinselly time of year for reflection and resolutions, I’m reviewing our own lifecycle emails here at Customer.io and thinking about how we can make them work smarter for us. What better time to dig through our posts from the past year to round up our best tips and strategies for creating lifecycle emails that drive customer engagement and happiness.

1. Use the Princess Bride formula for the best welcome emails.

Welcome emails are your chance to create a positive first impression and secure the trust that will fuel a long-term customer relationship. All you have to do is follow the lead of that fictionally famous swashbuckling swordsman Inigo Montoya.
Every welcome should have a greeting, an explanation of who you are, and set up what comes next:
  • Hello — the Greeting
  • My name is Inigo Montoya. You killed my father. — Who you are: a name and identifying information that provides the context required to make a connection (what you do, your interests, cares, and concerns)
  • Prepare to die. — What’s next for the reader? What should they do?
Princess Bride email formula
More about how to use The Princess Bride Formula or catch up with our whole class on how to create welcome emails.

2. Get smart about segments.

Stop hollering your message at whoever is out there — and communicate with specific people who are most ready to lend an ear (or eyes) with smarter segmentation. It’s the smarter way to email — cutting a shorter path to better engagement, deliverability, and revenue.
Modern platforms like Customer.io can segment people based on real-time activity and customer lifecycle. If you have a business where your customers are logging in with accounts, there’s no reason to get stuck on static lists that require constant upkeep and syncing or guess at engagement by looking at email opens and clicks.
You have the best chance at relevance when you can respond directly to individual context — so that your message feels personal and relevant rather than random shouts in the dark.
Get inspired with our collection of segmentation recipe ideas at “33 Ways to Personalize Your Emails at Scale.”

3. Don’t just send one email per goal.

People are busy and have more important things to do than deal with the loads of email flying about out there — which means there’s a really good chance that someone will miss your carefully crafted lifecycle email. And even if they do open and read you message, they might not heed your call to action.
If you only send one message for each goal you have, you’re greatly reducing your chances of success.
Send a series of drip emails for important goals that stop once people have taken action. Check out the drip series for iDoneThis, which aims to remind and convert free trial users to upgrade to a paid subscription. It takes more than one try.
iDoneThis trial email stats
The smartest marketers understand that persuasion takes time and follow-up and will not only implement behavioral drips for their conversion goals, but also try different tactics in different emails. For instance, if you’re trying to nudge someone to complete a key activation step, you can send a series of behavioral drip emails that employ different persuasion principles.
Catch up on targeted behavioral drip series in “What You Can Learn from Abandoned Cart Emails to Boost Sales” and different persuasion tactics you can use.

4. Use loss aversion.

Speaking of persuasion, there’s a pretty powerful psychological principle called loss aversion. People hate losing stuff — so much that they’re motivated to avoid it. If your product has a free trial, you can rely on the psychology of loss aversion to motivate people to reengage and convert to a paid subscription.
Here’s a striking example from Mention, a social media monitoring tool.
Mention trial retention email
Mention prompts people to act after a period of inactivity by proposing the suspension of your account altogether. It’s a powerful tactic that both spurs new users who want to avoid that loss to make a decision while filtering out user segments who were probably never going to activate.
More on loss aversion: “The Psychology of Upgrade Emails: Make Something to Lose

5. Use video to activate and onboard users.

Video and email are a powerhouse combo when it comes to engaging and teaching people. Video can help you improve clickthrough rates, fast-track activation, and make stronger emotional connections. StatusPage.io even boosted trial-to-paid conversion rate by 2.4x by sending onboarding emails with video to get people to try key features.
A quick best practice tip for incorporating video into your emails: don’t embed the video itself into the email since email clients don’t all support it. Instead, use a screenshot or thumbnail with a play button laid over the image and link that to the page with your video.
For more tips and examples, check out “Why You Should Use Video in Onboarding Emails.”

6. Sound like a real human being.

Just because you’re automating messages or represent a business doesn’t mean you can skip out on the actual communication part and sound like a robot. Emails, like all types of great, effective content, take work!
Write like a normal human being, tell stories instead of commanding readers to do your bidding, and show who you are as a brand and an organization.
The comedian Louis C.K. does a great job of sending emails in his voice. It feels personal and resonant, all while promoting his business. He accomplishes this by telling stories, deviating from stock email scripts, and using a super simple, readable text-only layout. Here’s a a quick example:
Louis C.K. promotional email
Learn the complete Email Marketing Lessons from Louis C.K., plus how organizations use similar tactics to get through to their readers.

7. Treat Email as Part of User Experience.

People are checking email way more often than they’re using your product. That’s why behavioral emails are so powerful. As Olark’s Sunir Shah reminds us, what’s paramount is the entire flow that people go through to complete their goal in a product or app.
Once you can reach out to people based on their activity and interactions with your business — you can make that flow a better experience. Your emails are part of your product and user experience.
  • Check out 7 examples of retention emails
  • Learn how Instacart uses email successfully as part of a broader user experience.
  • Why behavioral emails make your job easier.
Have any favorite tips that you’ve incorporated in your lifecycle emails this past year? Share with us in the comments!
To view the original article Click Here

Sunday, 23 August 2015

Conversion Focused Email Automation (on a budget)

Email Automation
Customer data is something that most companies will spend a huge amount of money and time attempting to gather. Personally, one of my top focuses for my blog is to grow my email list, because I find that the people that subscribe to my list will typically give me the best long-term return on investment. They’re the ones that share my content, download extra content and in some cases they’re the ones that convert into customers.
An Econsultancy study from March 2014 found that on average, companies are attributing 23% of their total sales to the email marketing channel. That’s a fairly sizeable chunk of revenue and it’s fair to say that I’ve seen similar figures across a number of my own clients. In some cases this figure is much higher.
Approximately what proportion of your total sales can you attribute to the email marketing channel?
In particular, bloggers can generate a huge amount of their overall revenue from their email subscribers (much higher than the figure above) through the upsell of downloadable assets like eBooks, guides and online courses. This is a strategy that most of the top bloggers across the world have utilised to great effect.
On average, companies are attributing 23% of their total sales to the email marketing channel. 
Now, it’s worth mentioning at this stage that you won’t just simply start generating revenue each time you add a new person to your email list – you need to nurture them through the sales funnel.
I see so many companies and individuals investing huge amounts of time and money into building their email list and minimal time into actually engaging with the subscribers. This is something that I was guilty of for a long time, and after making some very simple adjustments I’ve been able to dramatically increase traffic to my site from email, as well as increase social engagement and so on.
Instead of focusing on ways to build your email list, I’m going to explain the process that I take to automate email marketing campaigns in a way that serves the right content to each person at the right time. The eventual goal will focus on getting them to convert. It’s worth noting here that a conversion doesn’t just need to be revenue focused; instead, it could be any of the following:
  • Sharing content across social media.
  • Downloading extra content.
  • Leaving comments within your blog.
  • Linking back to your website content.
  • Posting reviews of your business.
That’s not an exhaustive list, but you get the idea.

The Content Marketing Funnel

Everyone looking to build an audience from their content should have an understanding of their content marketing funnel. The funnel shows the different stages in the conversion process for consumers of your content. Typically this is split into three parts: the top of the funnel (also known as TOFU), middle of the funnel (also known as MOFU) and the bottom of the funnel (also known as BOFU).
Content Marketing Funnel
The most common mistake that I see people make is sending the wrong message to people at each stage in the funnel. Whether this is supplying too conversion-focused content to those sitting within the top of the funnel or very general, non-tailored content to those at the bottom, the result can be very negative.
A perfect example of this can be described within a local hardware store. If a customer comes into the store because they’re fitting some shelves in their house and they need to pick up some screws, they already know what they want and they’re probably only going to be swayed on price. If the owner of the store decides that, instead of showing the customer where the screws are, they will direct the customer over to some general store information, for example, store opening times, their location, etc. then the customer is not only going to be slightly bemused but also quite frustrated.
At the other end of the spectrum, if a customer pops in to find out what time the hardware store closes and they’re instead directed to the selection of screws that the store sells, they’re going to be left both confused and annoyed.
There is a high possibility in both of the above scenarios that the potential customer will drop out of the funnel altogether.
This applies directly within the content that you’re serving to your potential customers, especially within your email campaigns. Just sending an email to your subscribers to say that you’ve posted a new blog isn’t good enough. You need to offer them value above and beyond that with a focus on moving them further down the funnel. Companies like Amazon have become the masters of perfecting this process.
This is where you need to design your email marketing workflow.

Designing Your Email Marketing Workflow

Email workflows are an incredibly powerful and time-efficient way of nurturing leads through to your business.
In short, they’re a series of automated emails that are sent out to people at different stages in the marketing funnel. Content will be tailored to their specific needs but can mostly all be prepared in advance.
I’m going to show you a simple process that I’ve used within a number of campaigns to get results. What’s more, I’ll show you how to set it all up within MailChimp (no major marketing automation needed). If you’ve got an email list of between 2,000-2,500 then it’s only going to cost you £20 per month!
Basic Email Workflow
The above diagram shows a basic 4-email workflow that guides users through the various stages of the marketing funnel.
The first email would be quite general content that’s relevant to the industry but takes a purely conversational/informative tone. A good example of this would be an email talking about a recent blog post – this could be something that someone has posted within the industry that your subscribers may find interesting.
Once the individual has opened/clicked this email they will move through to the second stage of the workflow (email 2). This email would still be fairly informative and industry-focused, but there will be an element of your brand to it. The ideal situation is to get the user to engage with this content in one way or another so that you can take their relationship with your brand to the next level of interaction. The perfect example would be with a branded app/tool.
However, you don’t need to have something at the level of an app or tool to create some engagement in this way. Another example could be running a webinar or a Q&A session within Twitter. The goal here is to get across your brand but also create some inbound conversation that will leave a lasting impression.
Moving to the next step in the workflow, this content will be very brand focused and quite personal to the user. The goal here is to showcase the capabilities of your brand and nurture people towards the bottom of the funnel. In the example above is a case study, which can be both valuable content to your subscribers and a perfect way of showcasing your capabilities.
The key with the email workflow is that the individual will only receive the next email in the flow once they’ve opened or engaged with the previous one. This means that you’re not going to be spamming your subscribers with tons of emails all at once.
The final email in the workflow above is completely conversion focused. This could be a product offer/discount or some product/service literature.

Designing More Complex Workflows

In the example above, it relies completely on an individual receiving content that they respond positively to and then them moving through to the next stage until they convert. This isn’t always the case though, and your sales process may not be this simple either.
By designing more complex workflows you’ll be able to offer different forms of content at the same stage in the process to try and tailor the experience that each individual is having.
Here’s an example of a workflow that delivers custom content at the bottom of the funnel depending on the interest that the prospect shows at previous stages:
Complex email marketing workflow
This is a perfect template for a blogger looking to encourage email subscribers to purchase their book, online course or other digital asset.
The three-tiered workflow allows an individual to move vertically through the flow as well as horizontally. For example, if the prospect were to click on a link within ‘Email 3A’ that is talking about an online course, then this person would be added into a segment that highlights them as interested in online courses. With this information, the workflow will then send them an email at the final stage related to your online course as opposed to your book.
The beauty of this is that the whole process can be automated. All you need to do is spend some initial time composing your emails.
Through creating more complex workflows, you increase the relevance of the content being delivered and the overall conversion rate.
Products like HubSpot’s marketing automation product or Intercom’s customer communications platform allow for even more than just emails to be included within the process. The likes of automated social activity, SMS and many other channels can all be included within a single workflow. The only issue is that most bloggers and individuals can’t afford this product, hence why I’m talking you through a much more cost-effective route to achieving some level of marketing automation.

Workflow Entry Points

The final point that I want to make before I get into the practical setup of the workflows within MailChimp is that individuals can come in at different points in the workflow. By this I mean that not everyone will start with the first email in the flow.
Let’s take a typical user journey from my own blog:
  1. Someone will look at researching around a specific topic related to digital marketing, for example link building, so they search for the term ‘link building techniques’ within the search engines.
  2. They find an article that I’ve written and click through to it (this is already covering the first stage of the email workflow above).
  3. The individual may like the advice that I’ve given and followed me on Twitter. After checking their Twitter feed they notice that I’m running a webinar and they sit in through it (this covers the second stage of my email workflow).
  4. Finally, they come back through to my website and download my free eBook focused on monetisation, giving me their email in the process.
This particular individual would now be much closer to the bottom of the funnel than someone who hasn’t really heard of me before.
It's critically important to map out the different entry points into your email workflow.
In this case, they’d go straight to the final stage in my email workflow and receive an upsell to a paid book that expands on monetization, a topic they’re clearly interesting in, in more detail.
It’s critically important to map out the different entry points into your email workflow because otherwise you risk offering the wrong type of content to people at differing stages in the funnel.

Setting Everything up in MailChimp

Here’s where we get to the practical part – setting up your workflow within MailChimp.
It’s also worth noting that you may be able to do this within some other tools, but I’ve found MailChimp to work particularly well without having to spend hundreds every month.
For the purpose of this example, I’ll show you how to set up a basic email workflow, as shown below, and then move on to some more complex processes:
Basic Email Workflow

Creating the Automation Workflow

I’m going to assume that you’ve set up your MailChimp account now and imported your email list.
The first stage is to go through to the Automation tab at the top and create a new workflow. A workflow is the name for the series of emails that will be sent out based on the trigger(s) that you specify.
MailChimp Automation
The next step is to click on the Create Automation Workflow button:
Create Automation Workflow
Once you’ve clicked this button it will bring you through to create a new email automation workflow.
At this point, you’ll want to select your email subscriber list from the drop-down in the top left and then select the box titled Custom as the workflow option:
Custom Workflow
You’ll be taken through to the Workflow Configuration page where you can give the workflow a title and adjust a few of the email details. For this one, name the workflow, “Funnel 1″. You can change the rest of the details to suit your own preferences – they won’t have an impact on the automation.
Once you’re done, press Next in the bottom-right corner of the page. This will bring you through to the Configure Trigger page:
Trigger Configuration
This is where you’ll decide how your email automation is initially triggered. You can change this within the drop-down list shown in the screenshot above.
There are a number of different options here:
Automation trigger options
To keep things simple I’m going to select the ‘Subscriber joins list’ option, which will trigger the email automation workflow to begin as soon as a new subscriber has joined your list. Alternative triggers include whenever someone opens an email campaign you’ve sent to them, when they click any link (or a specific link) within an email you send, when someone makes a purchase on your website (this requires eCommerce360 to be integrated with your website), and when someone on your list navigates to a URL or your website (requires Goal integration).
Once you’ve selected the option you want, deselect any boxes next to days that you don’t wish emails to be sent to your subscribers (e.g. if you don’t want your subscribers receiving emails on the weekend) and then press ‘Next’.
Add a new email
You’re now at the point where you can add in the individual emails that comprise your workflow. To do this, simply click the ‘Add Email’ button (Duh!).
I’d recommend adding all of the emails into your workflow first and then worrying about populating them afterwards. This gives you a chance to get the simple structure sorted out. Within this example, I’m going to add four emails.
Email automation workflow
You should now have something that resembles the above screenshot.
You’ll notice that between each of the emails there is a delay that you can edit. This just means that the next email in the series will be sent to your subscriber ‘x’ number of days after receiving/opening/clicking the previous one. I’d recommend starting with a longer delay at the beginning and then shortening the delay as you get further through the workflow.
On top of this, I’d recommend only triggering the next email in your workflow once your subscriber has opened or clicked on your previous email – this avoids them having 2/3 emails from you unopened in their inbox and dramatically reduced unsubscribe rates.
Now all that’s left to do is design your individual emails.
Designing your emails within MailChimp
The above screenshot is from one of the emails that I send out to new subscribers. It’s actually a 1,000 word post that you won’t find anywhere on my blog and contains information on a load of different tools that I’ve used to perform various tasks.
This serves a few purposes. It’s great TOFU content that people really enjoy and get instant value from subscribing with, and it also enables me to segment my audience based on the kind of tools they’re looking at. Depending on whether a subscriber clicks through to check out a link building tool, a social media tool or a content marketing tool, they will automatically be added into a custom segment in my MailChimp account (I’ve set this all up – it doesn’t happen automatically).
By doing this I can ensure that I’m only going to be sending people what they want to see. When a new subscriber is added into a custom segment, they’re triggered into a new automation workflow that’s completely tailored to their preferences. This is the beauty of automation – it’s not just about efficiency, it’s also about understanding your audience better.
Once you’ve finished designing each of your emails, it’s time to get them going live. One thing to note here is that once your automation workflow goes live it can be difficult to edit it again because this will mess up the flow of things. Double and triple check that everything is right before you get going.
Email automation report
Once your campaign is live, you’ll be able to go in and check out the full report across your whole workflow and the individual emails within it. These reports will help you improve your email marketing effectiveness over time, so make sure you’re checking these regularly.

Triggering with Website Activity

As I mentioned above, you can also integrate Goal with MailChimp so that you can trigger specific workflows to occur when one of your email subscribers visits a specific URL on your website.
To enable Goal integration, follow these steps:
  1. Log-in to MailChimp and go to your account settings.
  2. Click on Integrations.
  3. Click on Goal and expand the options.
  4. Click Enable.
  5. Copy the Goal tracking code and paste it between the <head> and </head> tags on your website.
Goa lIntegration Settings
Once you’ve got this set up, you can go back into your email automation tab and set up a new workflow. This time, instead of selecting a custom trigger, select the Website Activity option.
Website Activity Trigger
Now, when you go into the workflow settings you can select to trigger an email to be sent out whenever a subscribers comes through from your campaign and visits a specific URL. For example, if they come through to a product page you could send them a discount code.
All you need to do here is enter the URL in the Configure Trigger options:
Enter your goal trigger URL
Once you’ve set this up, you just need to follow the same steps to create your emails and set up the workflow to send out to your subscribers.
These kind of triggers are particularly good for sending through BOFU content.

Some Email Automation Ideas

You may have reached the end of this article and still be asking the question of “what can I send to my subscribers?”
That’s a good question and one that I’ll be covering in more detail in the coming weeks, but until then, here are a few ideas for simple email automation workflows that you can send out:
  1. Initial welcome email series.
  2. Thank you emails for downloading extra content.
  3. Email training course (micro-course on a very specific subject).
  4. Call to action to get people to follow you across social media.
  5. Extra tips/exclusive content following on from an article your subscriber has read.
  6. Product information for anyone that has visited the landing page on your site.
These are just a few small ideas, but you’ll definitely need to tailor all of this to your individual audience.
My recommendation is to design your email workflows in a way that will benefit your subscribers and provide you with more insight into their behaviour/interests.
As always, if you have any questions then drop them in the comments below and I’ll get back to you.
To view the original article Click Here