Thursday, 9 October 2014

SEO for Blogs 101: the Beginner’s Guide to Search Engine Optimization

Learning SEO for blogs is much simpler than it seems. In today’s post we’re gonna provide you with the basics in the simplest way possible. so that each and everyone of you can get started on it right away. You’ll see that the myth  (SEO = “very complicated”) is just that, a myth.. Okay, Let’s get started!
SEO para blogs

My story about the “SEO for blogs myth”:

To be honest, when I started with Postcron’s blog I didn’t know a lot about the “theory”or how to come up with it, optimize it or even take it to the next level. I only knew I love to write, convey knowledge, and help other people with their projects and businesses.
So, when the day came that I had to start researching/studying about SEO for bloggers, there was  tons of information, words, and structures. Although they aren’t really that complicated, they were explained or written in a really complicated way, which lead me to feel this way: :)
no entiendo seo 9gag
I think this first (bad) impression was due to the fact that many experts write about SEO assuming you already “know something” about the topic or that you’re an expert on blogging/HTML or that you are a super geek able to process big data, which I gotta confess isn’t MY case and it probably isn’t the case of many of you reading this right now.
After going through the mountain of information (which I DID go through) I internalized and learned a little (since I’m still learning). So, I thought I’d write a basic guide of SEO for blogs in the simplest, most friendly way possible, ideal for those like me, who know very little if anything about SEO. What it is, what it’s for, and how to apply it to a blog is everything we’re going to cover in this post.

WHAT DOES SEO MEAN?

SEO means: Search Engine Optimization.
I must admit that some years ago the first time I heard that word I wasn’t sure if they were talking about the CEO of a company or what… Really. I had no idea what SEO for blogs was.

HOW DOES IT WORK?


portada seo para blogs
In order for Google or other search engines to be able to present a search result for the user that’s actually useful and relevant to him/her, they use something called “spiders.” They seek out infomation, then investigate and analyze each of the web pages, then choose the high quality ones that fit well with the search that’s being performed at the moment. The algorithm of the search engine takes into consideration the relevance and popularity of the content (among other dozens of variables). Then, according to these factors they rank the pages and present the results as a list, the first one being the most popular/appropriate one, basically: the best one. The users trust so much in the intelligence of the search engine and therefore, believe that they’ll be luckier if they click on the first link rather than the tenth. For those of us on the other side (writers, bloggers, site managers) this is the biggest fear and challenge for us to overcome.
Summing up, knowing about SEO allows us to optimize our articles and actually have a chance to be the 1st spot on the list instead of the 26th.

WHY should we learn and study SEO for blogs?

Why learn about it? So you can get the #1 spot on the results list of the search engine.
1-ranking
Why is it important to be the first? Because it means TWO very important things:
  • 1-That you’re excellent at writing and that people think your content is valuable. This gives you a lot of authority, popularity and among other things, makes you feel that the hatd work and determination you put in, is worthwhile.  Leaving the sentimental aspect aside… let’s move on to the second reason:

  • 2-That you can make (a lot) more money. It’s cold but it’s true. If you’re in the first spot or even close you’ve got a hell of a lot more chances of people clicking on your link. This means more traffic, more prospective clients, sales, subscribers, advertising, sponsors, etc, etc, etc, etc, etc, etc.

SEO’S STRUCTURE: ON – OFF


  • WHAT’S ON-PAGE OPTIMIZATION?
    It’s everything you can do ON your page or IN your article in order to optimize it and get those spiders to find and analyze your content. It’s basically how you get the search engine to rank your article higher on the results listrelated to the topic or keyword of your post.
  • WHAT’S OFF-PAGE OPTIMIZATION?
    All of those external factors that influence the positioning of your article:popularity within social networks (how much it’s shared and/or commented on), if other sites have links to your articles, and so on. There are many factors (which we’ll develop throughout the article). The search engine considers all of this information, and measures the relevance and quality of the content and then ultimately decides if it’s worth showing the user or not.

WHAT TO OPTIMIZE WITHIN YOUR BLOG AND HOW TO DO SO

“ON-PAGE”

KEYWORDS:
These are the basis for the ON-page optimization of your article. That’s why it’s so important you use them in a clever way so spiders will find you and will be able to show you to the world. Otherwise, you can have excellent content, be an outstanding writer but if you are not discovered, what’s the point?
About the usage of keywords in the text, MOZ is one of the companies with more authority on the subject. In its basic guide for beginners they suggest the following checklist to know where and how many times to include keywords in an article. After this checklist, we’ll explain each point in more detail:
  • At least once in the main title (H1).
  • At least in one or two headings.
  • At least 3 times in the body of the article.
  • At least once in “bold” and “italics”.
  • At least once in the “Alt” of a picture (below we’ll show you how to do it and why).
  • Once in the URL.
  • At least once in the Meta description.

In more detail, WHERE…


  • URL:
    It’s important your URL isn’t too long or else spiders might render it as spam. So, it’s best if you keep it short and include the keywords. You can also edit it if your original title was long. Take a look at my example:
    permalink

  • TITLE:
    It’s the first place the algorithm analyzes, so you gotta inlude your keyword there. It’s recommended to avoid going over 70 characters (including spaces)in a title since that’s the amount of characters the engine shows in the results. This also has to do with Twitter, since we need to leave enough space to share the link without making it shorter. On the web there’s a lot of info for learninghow to write optimized titles.

  • HEADINGS:
    The second place spiders analyse are headings, H2, 3, 4, (etc) or however you’d like to call them. We recommend using H2 in these cases since they are the ones that hold more value. By the way, it’s recommended to place the keyword in each of them. It’s not necessary to include the keyword in each one because it’ll seem unnatural.

  • BODY:
    We suggest inluding the keyword 3 times. You can use it a few more times, as long as it doesn’t look artificial and the length of the text allows for it. A high density of keywords in a text can actually be a negative factor for Google, and cause them to categorize the article as low quality. Keep in mind, even more than keywords, the most important thing in SEO for blogs, is your blog. Your best strategy is the content, what you write. If it’s high quality, original, has good pictures, videos and links that provide appropriate extra information for your audience, the rest of the actions you perform around it will truly optimize it.

  • META DESCRIPTION:
    Okay, so, the tag in the meta description isn’t in fact a ranking factor for the algorithm but it’s the text the engine shows the user in the search results, which is why it should be attractive. From your blog’s administration screen you can modify them to include your keywords as well.
    metadescription

    • ALT TEXT IN PICTURES:
      Pictures are another element you can optimize. Their names should be related to the keyword or the topic so that they show up in the  results for image searches.  This makes them another source you can use to direct traffic to your blog. Instead of using “aksdbaksjdba254684.jpg” include a good short description related to your topic, not the topic itself (right?). It’s no good using: “basisandfoundationofseoforbloggers.jpg”.
    • Besides putting a descriptive name to the file of the picture, the “Alt-text” or alternative text is the text browsers  like (Chrome, Firefox, etc) show the user if for some reason they can’t show the picture. This alternative text is important for browsers because it’s an “alternative” to the picture. Take a look at how to define it in WordPress:
Summing up, we should make the spiders’ task easier so they can clearly identify what you are writing about, analyse it, and ultimately show YOUR article in the search results.
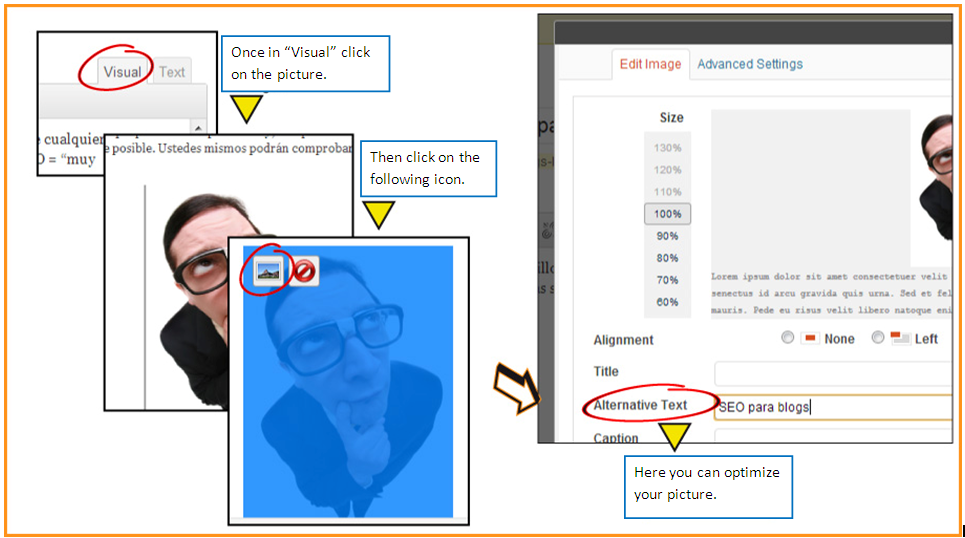
AltTextPictureSEOThere are several tools that you can use to confirm if the keyword you’ve selected is the one people use to find your content.
    • For instance, the suggestions that Google gives you when you search for something. Utilize this tool to help you find out what the most common phrases searching for your topic are. For example:

GoogleSearch
    • Google’s Keyword Planner: for those of you who have never used this tool here’s a “back to the basics” tutorial from Google so you can learn how to use it.

https://www.youtube.com/watch?v=IltpsVcxF9k
Ok, so I’ve covered the basics that you should take into account when developing “On page optimization”.

“OFF-PAGE”

Remember Off-page optimization refers to all those external factors that affect the positioning of your article.
    • Backlinks: These are all of the pages that quote our article using a link; they are the external links that point to our article. When someone creates a link from outside (from another site/blog) pointing to our article they’re creating a backlink which benefits us since the more people quoting our article in their blogs or sites the more chances spiders will consider your content as relevant and it will carry more weight when positioning in the ranking. You’ll find there are a lot of packages being offered with “backlinks” to be bought, but please, avoid doing that. An excellent  strategy to create backlinks in a natural way, is working with other colleagues and getting them to share your links in their articles and then you share their site or one of their posts. This way, not only do you create a community of your own but you also create a “chain of favors” that benefits both parties emensely.
      backlink seoAnother option for off site optimization is through “guest blogging”. You can participate in other blogs and, as long as it’s appropriate, include your site (through a link) or an article of yours if it adds information to the post you are writing as a guest. That way, you yourself create the backlinks.
    • Share your articles in social networks. Not only will you generate more traffic towards your blog but spiders also look for those posts that have been shared many times, that have lots of comments and/or have been mentioned on various  social networks. These are important factors when trying to influence your article’s position on the  search engine results list.

Other aspects to take into consideration:

1-Choose a plataform that’s easy to use and one which you can apply SEO strategies. I personally recommend WordPress because it’s the easiest and most practical. Besides, it has sooooo many more plugins, widgets and apps compatible to WP than any other platform (which is ideal for beginners in the SEO world.) We use the plugin for SEO called “WordPress SEO by Yoast“. Below you’ll see how to see how good your SEO is directly from WP. On the admin screen, look underneath your article and check on the following aspects:
seo check
2-Own your domain: Being the owner generates trust and promotes YOUR brand, not the platform’s brand. For example, it’s better to have blog.postcron.com instead of postcron.wordpress.com.
I hope you found this post useful and if I’ve left anything out of this basic guide that you consider important or would like to know how to do, please don’t hesitate to leave a comment so I can add it!
To view the original article Click Here

Wednesday, 8 October 2014

4 Simple Ways to Make Automated Emails Feel Personal…AND On-Brand


There’s no doubt about it: automating your marketing can bring incredible efficiencies to your business, allowing you to scale your efforts without losing precision. But you don’t want your automated messages to feel automated – you want your marketing to feel personal, to build connections, and you also want it to amplify your brand.
After all, it’s widely accepted that it takes at least seven positive marketing messages to make a brand stick in a potential customer’s mind. That means that every single message counts – especially until you’ve “stuck.” If your communications are not consistent with your products and company values, or are insensitive to information you’ve already collected, you may lose some of your highest quality leads.
Unfortunately, many companies are not effective enough during this delicate phase. Their brand messages aren’t building their credibility, or resonating with the audience receiving them.
Consumer brands like Coca Cola, on the other hand, are excellent at this – they have comprehensive, enforced brand guidelines to control every marketing message across all channels. They can justify huge spend on media like TV, radio, and print, and they enlist the help of high-profile celebrity endorsers, to simultaneously resonate with consumers and their personal values. They’re conscious of how brand voice, narrative, and imagery should all tell a consistent story.
B2B marketers generally have less money to spend and fewer channels to leverage than consumer marketers, but they also control a large proportion of brand transmissions in your emails. Luckily, automation can actually make your marketing more personal, and can also help you remain consistent in your messaging across every channel.
Here are four easy ways to create more on-brand emails which resonate with your prospects, using marketing automation, your data, and a little creativity:

1. Sender Personalisation and Brand Ambassadors

As people, we are hard-wired to crave connection with others, which is why, as marketers, we want to introduce our brand as authentic and personal. Despite this, many B2B marketers are still sending emails from “marketing@mycompany.com”, or signing emails with “Sincerely, Your Marketing Team.”
In other words, they’re simply begging for unsubscribes – who wants to be reminded that they’re on a marketing list. Instead, make sure you’re sending your emails from a real person – one who represents the values of your product or organization, and who fits with the message you are trying to convey. Choose brand ambassadors wisely. To give a widely publicized example, Coca-Cola chose Taylor Swift as the face of Diet Coke last year, which, due to her controversial, polarising persona, many blamed for a drop in Diet Coke’s sales.
If possible, send emails from a person who is highly relevant to the message – ideally, an expert in the subject matter discussed. Include an e-signature, links to Twitter, LinkedIn… whatever you decide will demonstrate authenticity. You might also include a photo of the sender in the email’s signature – try a little A/B testing to find out what drives the best results.
If you’re using marketing automation, you can tailor your “from” names to appeal specifically to each email send’s audience – you might use your own name, include contact information, or use the name of someone in your company (with their permission, of course!). This is where knowing your brand comes in – do you have a charismatic CMO whose name you’d like to highlight? Or do you position yourself as friendly practitioners? You can dive a little deeper into these options with our ebook, Creating Your Email Marketing Subject Lines and From Names.

2. Segmentation and Geographic Relevance

Nothing encourages an express opt-out like a message in the wrong language, or an event invitation from the wrong continent! These messages are highly irritating, and are guaranteed to result in unsubscribes. If you’re marketing globally, an incorrect geographic filter can even have legal implications.
That’s why we recommend segmenting the audience you send emails to. Beyond geography, you might also consider segmenting your audience by gender, age, job title, company size, industry, interests, and more. Marketing automation makes segmentation easy to implement, helping you avoid this major (and surprisingly common) faux-pas.

3. Use Your Data to Find Other Data

Data has a way of hiding right under your nose. Often, marketers will waste time gathering info, only to discover only that they’ve had what they needed all along.
For instance, some industries and countries require you to address potential customers formally – typically with both a salutation and last name. If you don’t have this information for every prospect in your database, you might be daunted by the idea.
But if you’re looking for a last name, these are often included in email addresses…can you pull from there? If you’re looking for a prospect’s gender, can you discern it based off of first names? Both country and state can often be derived from contact fields.
You can also derive a prospect’s interest in a product based on behavior, which marketing automation can help you track. In short, don’t re-invent the wheel – take advantage of automation to cleverly embellish your data with information you already have.
With a little creativity and the help of automated campaigns, your database will rapidly fill up with the personal details needed to make emails feel individually tailored.

4. Create Resonance with Scoring

And finally, use lead scoring – an essential, but often overlooked marketing tool that is used to qualify and pass along leads to sales. If you’re using marketing automation, lead scoring presents a ready-made yardstick to measure how responsive new leads are to your content.
First, marketers define levels of buyer interest (i.e. early, mid, and late stage), and then set parameters to determine a lead’s qualification for each level. As each lead progresses from one stage to the next, the messages they receive can be adjusted in turn.
You know how interested a lead is in your product or services, so you can be sure you’re communicating in a personally relevant (but still automated!) way, sending the right content at the right time. Remember those first, most crucial seven touch points? Carefully plan your content streams for the most resonant results. This is often the difference between a marketing message that results in qualified leads, and a marketing message that results in an unsubscribe.
So how can you measure success? Your response rate!
You know you are making personal connection with the right brand messages when someone responds to an automated email. Honour this with a response whenever you can. And congratulations! It’s not easy to achieve.
So those are my four most effective tactics to make automation feel both personal and on-brand. Any questions about putting them into practice? Want to share a few successes of your own? Let us know in the comments below.
To view the original article Click Here

Tuesday, 7 October 2014

5 Super Easy Ways To Create Images for Your Blog Posts

Create Great Images for Your Blog Posts
Images for your blog posts are important for many reasons. They illustrate important points to your readers, make social shares of your posts stand out in the newsfeed, break up text to make the content easier to read, and encourage people to share your post for no other reason than they like the main image. While there are many sources of ready to use images available, you should consider creating unique images on your own.
In this post, we’re going to look at the reasons why you should create your own great images for content and the ways you can do it.

Why You Need to Create Your Own Images

You might be wondering, since I mentioned that there are many sources of ready to use images already available, why you would want to spend the time creating your own. Here are just a few good reasons.
  • Stock photos are generic and widely used. Anyone can buy and use a stock photo for less than a dollar, which means many images appear on the Internet hundreds, or even thousands of times. If you’re goal is to create unique content, why top it off with a generic image?
  • Creative Commons image use can backfire. Many Creative Commons images are licensed specifically for non-commercial use. Non-commercial is open to interpretation by the owner of the image, therefore, if you use their image on a blog owned by a business or a blog that generates revenue, it may be considered commercial usage.
  • People are more like to share images they’ve never seen. People who love sharing images on sites like Pinterest are more likely to share yours if it’s something they’ve never seen before that is either useful or simply visually appealing.
Now that you know why you should create your own images, let’s take a look at how to create them.

How to Create Effective Screenshots

For those who enjoy creating how-to and tutorial content, screenshots are essential. Free tools like Jing will allow you to not only capture screenshots, but also easily annotate them. Annotations help make your points or instructions crystal clear to readers who need a little visual supplementation.
annotated-screenshots
People will not only appreciate your ability to illustrate your points clearly, but you’ll also get requests from others who want to share your annotated screenshots. Use those requests to get your name in front of new audiences without any additional work.
Another great tool for screenshots is FooCapture. You install the extension on Google Chrome and use it to capture screenshots, annotate them, and have them automatically added to your WordPress (WordPress.com or WordPress.org) media library. Premium service plans for this tool is only $6 per month for unlimited connections / WordPress connections.

How to Customize Images on Canva

For graphically challenged individuals like myself, Canva is a tool that helps you quickly create graphics for your blog content, social media, and presentations. They have templates with built-in images and overlay text that you customize to fit your content. All of the work is done online, and what you create is free, unless you pick a template that uses a stock photo in the background.
canva-blog-graphics
If you’ve browsed the blog graphic templates, you might have noticed they all come in one size (800px x 1200px). The key to using Canva is to not limit yourself to the blog graphic templates, even if that’s what you are using them for. There is a total of twenty categories of template types, with square and rectangular designs. You might find that the Facebook cover templates are better suited to your posts than the actual blog graphic templates.
To further customize your images, use your own background photos, or find stock imagery from other sources. This will easily differentiate your blog graphics from someone else’s. When you do choose your own background photo, aim for a similar color pattern and blurring effect, the latter of which you can do using tools mentioned in the upcoming section about using your own photographs. This will ensure the text overlay provided in the template still stands out.

How to Generate Infographics

Infographics have gotten a bad reputation in the last year due to the influx of low-quality infographics created in order to build links for SEO purposes. They are still some of the most popular types of images to share.
So how do you create infographics? First, you’ll need to start with some interesting data that relates to your products, services, or industry. ShareThis, a popular social sharing plugin, regularly publishes infographics about the social sharing statistics around music festivals, sporting events, holidays, and other trending topics. If you don’t have data from your products, you can usepublic data sources or conduct surveys on your own.
Once you have your data, you will want to share it in a visually appealing image, aka the infographic. Tools like Piktochart allow you to create infographics based on pre-built templates or using their drag and drop editor, removing the need for you to be a graphic designer.
piktochart-for-infographics
Similar tools include Infogr.am, Visual.ly, and Easel.ly.

How to Use Your Own Photographs

If you enjoy photography, then creating your own photos for content is a great way to incorporate your hobby into your marketing. Take your camera everywhere you go to capture images that could be used for future pieces of content.
For example, if you write about local marketing, then photos of local businesses would be great literal options. If you like to inject some humor into your content, take photos of things that would be funny. Any opportunity to photograph a scene with words can also come in handy for content.
photography-for-content-1
The best part about using your own photography is that you don’t have to be a professional photographer with expensive equipment and software to create great photos. You can simply use your smartphone and free apps like Aviary to edit the photos you create, right on your device.
For those who do have a digital camera, you can do simple editing work (such as cropping your images) in free programs like Gimp. For those who want to do more advanced editing, such as adjusting brightness, contrast, color balance, saturation, clarity, and built-in presets, there isAdobe Lightroom.
photography-for-content-2
It has lots of great features for photo editing without the complexity of Photoshop. Best of all, thanks to the Adobe Creative Cloud, if you do want Photoshop, you pay a monthly access fee as opposed to hundreds of dollars up front. For example, you can take Photoshop and Lightroom for a 30-day free trial, and then pay for $9.99 per month.

How to Create Memes

Speaking of using your own photography, if you’re a fan of memes, you can create your own with your photographs. Start by going to the all famous Cheezburger site and click on the Create link at the top right.
make-a-meme
To add a simple caption, choose the Add a caption option. Upload your photo, and then select it to add some captions.
make-a-meme-2
The result? Your own meme!
make-a-meme-1
Captions can help you turn almost any image into one that is relevant to the piece of content you are writing. The best part is people love them! I created one for a post a while back using a photo of my newest adopted family member – a sweet little black and white kitten. It resulted in a lot of pins.
meme-pins
One note on creating memes with tools like the LOLbuilders. You should be sure to visit the website’s Terms and Conditions to see how the website treats user submissions. When you upload your photo, you may keep the copyright, but your photo may be shared with other users on the website as well.
Photography by Kristi Hines. All Rights Reserved.
Do you create images for your content? What types of images and tools do you use? Please share in the comments!
To view the original article Click Here