

Customer data is something that most companies will spend a huge amount of money and time attempting to gather. Personally, one of my top focuses for my blog is to grow my email list, because I find that the people that subscribe to my list will typically give me the best long-term return on investment. They’re the ones that share my content, download extra content and in some cases they’re the ones that convert into customers.
An Econsultancy study from March 2014 found that on average, companies are attributing 23% of their total sales to the email marketing channel. That’s a fairly sizeable chunk of revenue and it’s fair to say that I’ve seen similar figures across a number of my own clients. In some cases this figure is much higher.

Approximately what proportion of your total sales can you attribute to the email marketing channel?
In particular, bloggers can generate a huge amount of their overall revenue from their email subscribers (much higher than the figure above) through the upsell of downloadable assets like eBooks, guides and online courses. This is a strategy that most of the top bloggers across the world have utilised to great effect.
On average, companies are attributing 23% of their total sales to the email marketing channel.
Now, it’s worth mentioning at this stage that you won’t just simply start generating revenue each time you add a new person to your email list – you need to nurture them through the sales funnel.
I see so many companies and individuals investing huge amounts of time and money into building their email list and minimal time into actually engaging with the subscribers. This is something that I was guilty of for a long time, and after making some very simple adjustments I’ve been able to dramatically increase traffic to my site from email, as well as increase social engagement and so on.
Instead of focusing on ways to build your email list, I’m going to explain the process that I take to automate email marketing campaigns in a way that serves the right content to each person at the right time. The eventual goal will focus on getting them to convert. It’s worth noting here that a conversion doesn’t just need to be revenue focused; instead, it could be any of the following:
- Sharing content across social media.
- Downloading extra content.
- Leaving comments within your blog.
- Linking back to your website content.
- Posting reviews of your business.
That’s not an exhaustive list, but you get the idea.
The Content Marketing Funnel
Everyone looking to build an audience from their content should have an understanding of their content marketing funnel. The funnel shows the different stages in the conversion process for consumers of your content. Typically this is split into three parts: the top of the funnel (also known as TOFU), middle of the funnel (also known as MOFU) and the bottom of the funnel (also known as BOFU).

The most common mistake that I see people make is sending the wrong message to people at each stage in the funnel. Whether this is supplying too conversion-focused content to those sitting within the top of the funnel or very general, non-tailored content to those at the bottom, the result can be very negative.
A perfect example of this can be described within a local hardware store. If a customer comes into the store because they’re fitting some shelves in their house and they need to pick up some screws, they already know what they want and they’re probably only going to be swayed on price. If the owner of the store decides that, instead of showing the customer where the screws are, they will direct the customer over to some general store information, for example, store opening times, their location, etc. then the customer is not only going to be slightly bemused but also quite frustrated.
At the other end of the spectrum, if a customer pops in to find out what time the hardware store closes and they’re instead directed to the selection of screws that the store sells, they’re going to be left both confused and annoyed.
There is a high possibility in both of the above scenarios that the potential customer will drop out of the funnel altogether.
This applies directly within the content that you’re serving to your potential customers, especially within your email campaigns. Just sending an email to your subscribers to say that you’ve posted a new blog isn’t good enough. You need to offer them value above and beyond that with a focus on moving them further down the funnel. Companies like Amazon have become the masters of perfecting this process.
This is where you need to design your email marketing workflow.
Designing Your Email Marketing Workflow
Email workflows are an incredibly powerful and time-efficient way of nurturing leads through to your business.
In short, they’re a series of automated emails that are sent out to people at different stages in the marketing funnel. Content will be tailored to their specific needs but can mostly all be prepared in advance.
I’m going to show you a simple process that I’ve used within a number of campaigns to get results. What’s more, I’ll show you how to set it all up within MailChimp (no major marketing automation needed). If you’ve got an email list of between 2,000-2,500 then it’s only going to cost you £20 per month!
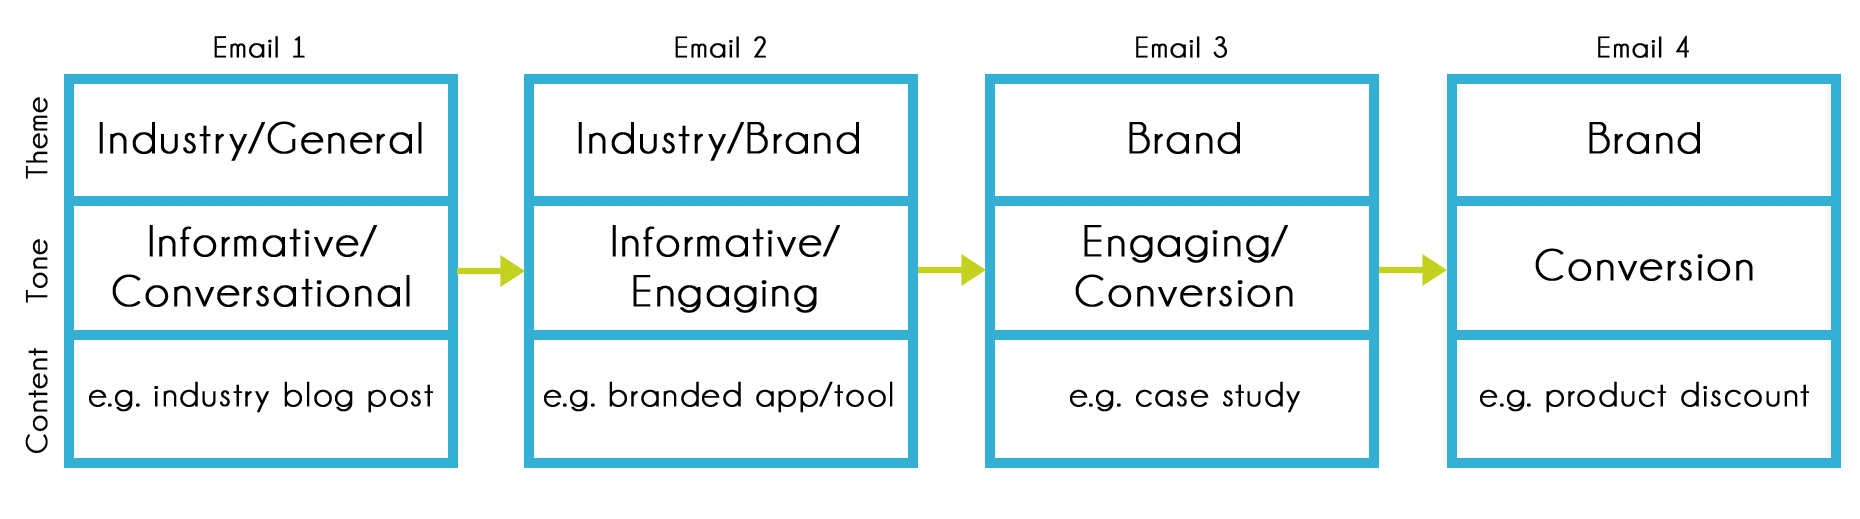
The above diagram shows a basic 4-email workflow that guides users through the various stages of the marketing funnel.
The first email would be quite general content that’s relevant to the industry but takes a purely conversational/informative tone. A good example of this would be an email talking about a recent blog post – this could be something that someone has posted within the industry that your subscribers may find interesting.
Once the individual has opened/clicked this email they will move through to the second stage of the workflow (email 2). This email would still be fairly informative and industry-focused, but there will be an element of your brand to it. The ideal situation is to get the user to engage with this content in one way or another so that you can take their relationship with your brand to the next level of interaction. The perfect example would be with a branded app/tool.
However, you don’t need to have something at the level of an app or tool to create some engagement in this way. Another example could be running a webinar or a Q&A session within Twitter. The goal here is to get across your brand but also create some inbound conversation that will leave a lasting impression.
Moving to the next step in the workflow, this content will be very brand focused and quite personal to the user. The goal here is to showcase the capabilities of your brand and nurture people towards the bottom of the funnel. In the example above is a case study, which can be both valuable content to your subscribers and a perfect way of showcasing your capabilities.
The key with the email workflow is that the individual will only receive the next email in the flow once they’ve opened or engaged with the previous one. This means that you’re not going to be spamming your subscribers with tons of emails all at once.
The final email in the workflow above is completely conversion focused. This could be a product offer/discount or some product/service literature.
Designing More Complex Workflows
In the example above, it relies completely on an individual receiving content that they respond positively to and then them moving through to the next stage until they convert. This isn’t always the case though, and your sales process may not be this simple either.
By designing more complex workflows you’ll be able to offer different forms of content at the same stage in the process to try and tailor the experience that each individual is having.
Here’s an example of a workflow that delivers custom content at the bottom of the funnel depending on the interest that the prospect shows at previous stages:

This is a perfect template for a blogger looking to encourage email subscribers to purchase their book, online course or other digital asset.
The three-tiered workflow allows an individual to move vertically through the flow as well as horizontally. For example, if the prospect were to click on a link within ‘Email 3A’ that is talking about an online course, then this person would be added into a segment that highlights them as interested in online courses. With this information, the workflow will then send them an email at the final stage related to your online course as opposed to your book.
The beauty of this is that the whole process can be automated. All you need to do is spend some initial time composing your emails.
Through creating more complex workflows, you increase the relevance of the content being delivered and the overall conversion rate.
Products like HubSpot’s marketing automation product or Intercom’s customer communications platform allow for even more than just emails to be included within the process. The likes of automated social activity, SMS and many other channels can all be included within a single workflow. The only issue is that most bloggers and individuals can’t afford this product, hence why I’m talking you through a much more cost-effective route to achieving some level of marketing automation.
Workflow Entry Points
The final point that I want to make before I get into the practical setup of the workflows within MailChimp is that individuals can come in at different points in the workflow. By this I mean that not everyone will start with the first email in the flow.
Let’s take a typical user journey from my own blog:
- Someone will look at researching around a specific topic related to digital marketing, for example link building, so they search for the term ‘link building techniques’ within the search engines.
- They find an article that I’ve written and click through to it (this is already covering the first stage of the email workflow above).
- The individual may like the advice that I’ve given and followed me on Twitter. After checking their Twitter feed they notice that I’m running a webinar and they sit in through it (this covers the second stage of my email workflow).
- Finally, they come back through to my website and download my free eBook focused on monetisation, giving me their email in the process.
This particular individual would now be much closer to the bottom of the funnel than someone who hasn’t really heard of me before.
It's critically important to map out the different entry points into your email workflow.
In this case, they’d go straight to the final stage in my email workflow and receive an upsell to a paid book that expands on monetization, a topic they’re clearly interesting in, in more detail.
It’s critically important to map out the different entry points into your email workflow because otherwise you risk offering the wrong type of content to people at differing stages in the funnel.
Setting Everything up in MailChimp
Here’s where we get to the practical part – setting up your workflow within MailChimp.
It’s also worth noting that you may be able to do this within some other tools, but I’ve found MailChimp to work particularly well without having to spend hundreds every month.
For the purpose of this example, I’ll show you how to set up a basic email workflow, as shown below, and then move on to some more complex processes:
Creating the Automation Workflow
I’m going to assume that you’ve set up your MailChimp account now and imported your email list.
The first stage is to go through to the Automation tab at the top and create a new workflow. A workflow is the name for the series of emails that will be sent out based on the trigger(s) that you specify.

The next step is to click on the Create Automation Workflow button:

Once you’ve clicked this button it will bring you through to create a new email automation workflow.
At this point, you’ll want to select your email subscriber list from the drop-down in the top left and then select the box titled Custom as the workflow option:

You’ll be taken through to the Workflow Configuration page where you can give the workflow a title and adjust a few of the email details. For this one, name the workflow, “Funnel 1″. You can change the rest of the details to suit your own preferences – they won’t have an impact on the automation.
Once you’re done, press Next in the bottom-right corner of the page. This will bring you through to the Configure Trigger page:

This is where you’ll decide how your email automation is initially triggered. You can change this within the drop-down list shown in the screenshot above.
There are a number of different options here:

To keep things simple I’m going to select the ‘Subscriber joins list’ option, which will trigger the email automation workflow to begin as soon as a new subscriber has joined your list. Alternative triggers include whenever someone opens an email campaign you’ve sent to them, when they click any link (or a specific link) within an email you send, when someone makes a purchase on your website (this requires eCommerce360 to be integrated with your website), and when someone on your list navigates to a URL or your website (requires Goal integration).
Once you’ve selected the option you want, deselect any boxes next to days that you don’t wish emails to be sent to your subscribers (e.g. if you don’t want your subscribers receiving emails on the weekend) and then press ‘Next’.

You’re now at the point where you can add in the individual emails that comprise your workflow. To do this, simply click the ‘Add Email’ button (Duh!).
I’d recommend adding all of the emails into your workflow first and then worrying about populating them afterwards. This gives you a chance to get the simple structure sorted out. Within this example, I’m going to add four emails.

You should now have something that resembles the above screenshot.
You’ll notice that between each of the emails there is a delay that you can edit. This just means that the next email in the series will be sent to your subscriber ‘x’ number of days after receiving/opening/clicking the previous one. I’d recommend starting with a longer delay at the beginning and then shortening the delay as you get further through the workflow.
On top of this, I’d recommend only triggering the next email in your workflow once your subscriber has opened or clicked on your previous email – this avoids them having 2/3 emails from you unopened in their inbox and dramatically reduced unsubscribe rates.
Now all that’s left to do is design your individual emails.

The above screenshot is from one of the emails that I send out to new subscribers. It’s actually a 1,000 word post that you won’t find anywhere on my blog and contains information on a load of different tools that I’ve used to perform various tasks.
This serves a few purposes. It’s great TOFU content that people really enjoy and get instant value from subscribing with, and it also enables me to segment my audience based on the kind of tools they’re looking at. Depending on whether a subscriber clicks through to check out a link building tool, a social media tool or a content marketing tool, they will automatically be added into a custom segment in my MailChimp account (I’ve set this all up – it doesn’t happen automatically).
By doing this I can ensure that I’m only going to be sending people what they want to see. When a new subscriber is added into a custom segment, they’re triggered into a new automation workflow that’s completely tailored to their preferences. This is the beauty of automation – it’s not just about efficiency, it’s also about understanding your audience better.
Once you’ve finished designing each of your emails, it’s time to get them going live. One thing to note here is that once your automation workflow goes live it can be difficult to edit it again because this will mess up the flow of things. Double and triple check that everything is right before you get going.

Once your campaign is live, you’ll be able to go in and check out the full report across your whole workflow and the individual emails within it. These reports will help you improve your email marketing effectiveness over time, so make sure you’re checking these regularly.
Triggering with Website Activity
As I mentioned above, you can also integrate Goal with MailChimp so that you can trigger specific workflows to occur when one of your email subscribers visits a specific URL on your website.
To enable Goal integration, follow these steps:
- Log-in to MailChimp and go to your account settings.
- Click on Integrations.
- Click on Goal and expand the options.
- Click Enable.
- Copy the Goal tracking code and paste it between the <head> and </head> tags on your website.

Once you’ve got this set up, you can go back into your email automation tab and set up a new workflow. This time, instead of selecting a custom trigger, select the Website Activity option.

Now, when you go into the workflow settings you can select to trigger an email to be sent out whenever a subscribers comes through from your campaign and visits a specific URL. For example, if they come through to a product page you could send them a discount code.
All you need to do here is enter the URL in the Configure Trigger options:

Once you’ve set this up, you just need to follow the same steps to create your emails and set up the workflow to send out to your subscribers.
These kind of triggers are particularly good for sending through BOFU content.
Some Email Automation Ideas
You may have reached the end of this article and still be asking the question of “what can I send to my subscribers?”
That’s a good question and one that I’ll be covering in more detail in the coming weeks, but until then, here are a few ideas for simple email automation workflows that you can send out:
- Initial welcome email series.
- Thank you emails for downloading extra content.
- Email training course (micro-course on a very specific subject).
- Call to action to get people to follow you across social media.
- Extra tips/exclusive content following on from an article your subscriber has read.
- Product information for anyone that has visited the landing page on your site.
These are just a few small ideas, but you’ll definitely need to tailor all of this to your individual audience.
My recommendation is to design your email workflows in a way that will benefit your subscribers and provide you with more insight into their behaviour/interests.
As always, if you have any questions then drop them in the comments below and I’ll get back to you.
To view the original article Click Here
No comments:
Post a Comment